Art Journaling is so relaxing – but…only if you Embrace Your Imperfections! I think a large part of the reason I love it is that I know I’m not sending it to anyone – like I do when I’m creating cards. I share it with all of you but you are my fellow crafters and you “get it” so it takes away that desire to be overly critical. It’s something I do for fun and for me! (And you, of course!)

For me, Family is IT. It is everything to me. I have a big family and we’re crazy but lovable! I’m always drawn to Family Themes and Projects. My Sister became a Grandmother for the first time – twin boys. Not because they’re “ours,” but they are the cutest kids ever! She lives here in NY and the boys live in Florida. She works like crazy so she can fly down for the weekend once a month and see them. I know how difficult that is for her but she makes it an absolute priority and I respect that.

So – here’s my Art Journal Cover. It was inspired by Dyan Reavely’s larger version. I applied Multi Medium Matte to the cover and adhered Tim Holtz’s Letterpress Alphabet into it. The letters are different sizes so it’s kinda like a puzzle. I applied a little Distress Paint to the letters of my name using my fingers and then covered them with Crystal Effects.

The back cover was distressed like Wendy Vecchi’s Art Parts covers. I put a very thin coat of Black Embossing Paste onto the back cover, intentionally leaving some spots without it (on the edges) because they take the Distress Ink better without paste on them). When that dried, I covered it with Crackle Paste and allowed it to dry. The thicker you apply the Crackle Paste, the bigger your cracks will be.

Once it was dry, I moved the elastic band that keeps the book closed and repeated the procedure for the strip that was preciously covered. Once that was dry, I sponged over the cover with Archival Inks in Cornflower Blue, Orange Blossom and Tree Branch. A little Walnut Stain Distress Ink was sponged over the cover using a Blending Tool.

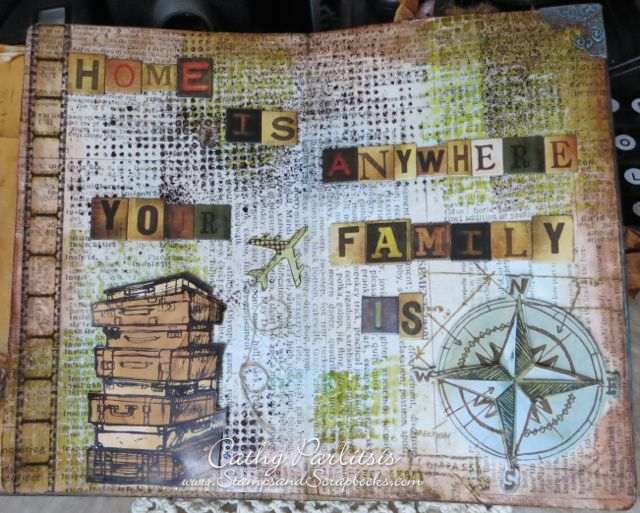
For the Home Art Journal Pages, I prepped them with Multi Medium Matte and then adhered Tim Holtz’s Tissue Paper. When that dried, I applied Embossing Paste through TH’s Burlap Stencil and allowed to dry. I sponged some Distress Ink onto the pages using a Blending Tool to add a little color.

Next, I spritzed Walnut Distress Stain through the TH Faded Dots Stencil and allowed to dry. Vintage Photo Distress Ink was sponged over the edges of the Art Journal Pages.

For the page elements, I used several Alcohol Ink Backgrounds. I love doing Alcohol Ink Backgrounds! They’re so easy and every one is interesting and unique. The TH Compass Blueprint and matching Dies were used to stamp in Tree Branch Archival Ink over the Alcohol Ink Backgrounds several times. The Dies were then used to cut out multiple layers of the stamped image. They were then reassembled using Stampin’ Dimensionals.

A while back, I did a bunch of these backgrounds. You can see the Tutorial HERE.

You can see the great dimension you can achieve with the stamps and dies.

The Suitcases were created in a similar fashion but had to be fussy cut as there is no die for them. 🙁

I used Tree Branch and Potting Soil Archival Inks mixed with Alcohol on a Craft Sheet.

I swiped Specialty Stamping Paper through the inks and heat set. I used another piece of Specialty Stamping Paper to swipe through the left-over inks. This created a lighter version.

I stamped the TH Suitcases onto both pieces of card stock using Jet Black Archival Ink and heat set.

I cut the individual suitcases from the lighter version and adhered a couple on top of the darker stamped image using Stampin’ Dimensionals.

Using TH’s Mini Blueprints and a left-over piece of Alcohol Ink Background Paper, I stamped the airplane postage stamp in SU! Early Espresso Ink and embossed it with Clear Embossing Powder and a Heat Tool. I fussy cut it and adhered it to the Journal Page. To create the little smoke trail, I adhered a little fiber using Crystal Effects.

TH’s Alpha Tiles were used to spell out “Home is Anywhere Your Family Is.“ Film Strip was adhered to the left side using a Tiny Fastener and Glue Dots to complete the Journal Pages.
If you managed to get this far, thank you so much for visiting! If you’d like Free Samples to your “In” Box, you can Click here to subscribe to my mailing list.
Challenges:
Simon Says Stamp – Monday – Finishing Touch
Simon Says Stamp – Wednesday – Transport It
Mixed Media Monthly – Ribbons, Twine or Fiber


This is such a great journal page. I love the background and all the details that you added. Using that fiber for the airplane smoke was such a creative idea!! Thanks so much for playing at The Mixed Media Monthly Challenge.
Thanks so much, Donna! I enjoyed doing it! 😀 Thanks for the inspirational prompt!
Wow that cover is just soo cool! I love the letters and the texture on the back. Beautiful pages in the journal and the continuation of the letters on the pages. Thank you for playing along with us at Simon Says Stamp Monday Challenge again this week!
Thanks, Suzz! 😀
Great art journal pages. Love all the details, colors and textures!! Love the fiber you used too!! Thanks for joining us in this month’s Mixed Media Monthly Challenge!!
Thank you, Lynn! Glad you liked them!
Fantastic page, great layers and great quote! Thanks so much for playing along with the Transport It Challenge over on the Simon Says Stamp Wednesday Challenge Blog this week 🙂
Thanks so much! I love Art Journaling!