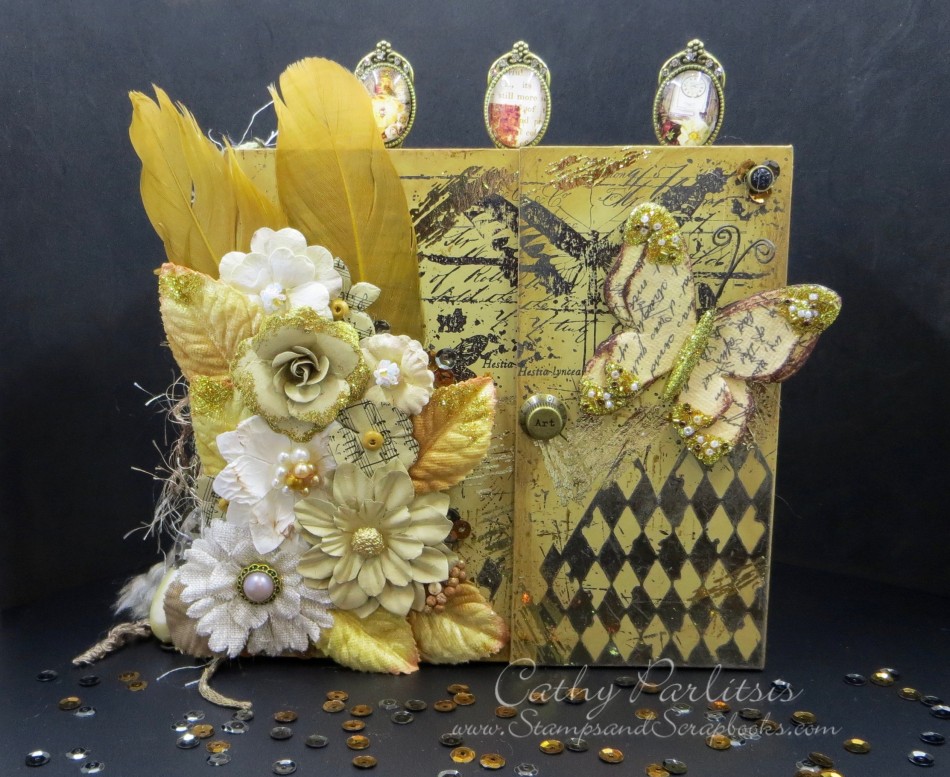
LET THE VOTING BEGIN!! I could not be more excited about the Best Blogger Craft 2016 Contest!!! I created this Shabby Chic Album as my entry and I would LOVE it if you would take a moment to VOTE for me at FaveCrafts. (Look for my name & VOTE! You can only vote one time each from your phone, computer and/or iPad.)

One of my favorite accents on this project is the New iCraft Deco Foil Sheets in Gold (ThermoWeb) on the cover and throughout the pages.

The harlequin pattern was created using a stencil (Sizzix) to cut out iCraft Easy Cut Adhesive Sheets (Thermoweb) and rubbing a New Deco Foil Sheet in Pewter (ThermoWeb too!) over it.

The base of the project is a chipboard album (Prima) with a magnetic closure.

All of the embellishments – flowers, feathers, butterfly, chain and oval clips are also Prima. The “dangles” on the chain were recycled from an old keychain I had. The original mini chains were silver so I dabbed them with copper paint and attached to the bigger chain with jump rings.

Before doing anything else, I painted the album inside and out using Camel Folk Art Acrylic Paint (Plaid).

The edges of each page and all covers were then sponged with Brown Ink to give them a more vintage feel.


Various Stamps were used with Brown and Black Inks to create a random background on the covers.
The Chipboard Pages of the book were approximately 6 x 6 so the Patterned Papers were cut to 5-3/4″ x 5-3/4″ and adhered using iCraft Easy Tear Tape (Thermoweb). The papers for the flaps were 4″ x 6″ Notecards so the card stock mats were cut to 4-1/4″ x 8″ with a 2″ score line to tuck behind to secure the flap.

This is my favorite layout in the book so, of course, I used it for the first page. The papers are from the Vintage Emporium Collection (Prima) and looked this grungy-gorgeous all by themselves!
The Gold Foil was applied to a Rub On for my absolute favorite accent in the album. It was so easy and I just love the way it turned out! Here’s a close-up.

Sadly, the photos don’t do it any justice. “In person,” it’s so shiny!

This is the same layout with the flap open. The flaps are easy to create.

Just layer your patterned paper onto a piece of card stock and score at 1-1/2 or 2″ to create a flap. Adhere the flap under the card stock before attaching it to your chip board page.

The second layout has a flap that lifts up. It also has a Gold Foil accent. You’ll notice there’s a couple of white spots where I accidentally tore the paper. These happy accidents often force you to create add-ons that will later become some of your most beautiful additions. Scroll down to see how I “fixed” this.

This is the view with the flap “open” or lifted up. These flaps are great mats for photos or hidden journaling.

When I create a scrapbook, I always add a few pockets for ephemera. This pocket was created by wrapping a piece of vintage lace around the patterned paper and securing it behind prior to attaching it to the chipboard page.
Since I haven’t added the authentic photos and memorabilia, I stuffed a card from the same collection of papers and a tag into the pocket.

The third layout has flaps on both sides. I added a delicious Gold Foil design down the page.

These are the open flaps.

The fourth layout has a card stock flap that was embossed with an Embossing Folder (Sizzix). I added 2-Way Glue and rubbed Pewter Foil over a couple of the accents.

This layout has a pocket on the left side created by adhering 3 sides of a piece of patterned paper with the opening on top. Gold Foil was applied over a rub on to create the shiny script.

These pages have three flaps. One on the left and two on the right. (I know! I really get so carried away with myself! LOL)

The two flaps are layered with an embellishment clipped to the second page. (See close-up below)

I love, love, love the Gold Foil over the Rose/Script Rub-on! A strip of Vintage Lace was applied to the right side flap.

A strip of Patterned Paper and Vintage Lace were used to create a side flap.

Open view.

The feathers, flowers and berries were hot glued to the cover. Little sequins were adhered with Zots Singles (Testors).
For added embellishments – and to fix any mistakes 😉 – I used a Sizzix postage stamp thinlit to cut another patterned paper card.

You can add them as sheets of “postage stamps” or cut them out and adhere them as individual stamps. I used one to cover up the torn paper on my page here:

They also look great peeking out of one of the pockets!

Thanks so much for stopping by! I would greatly appreciate your VOTE which you can place by clicking HERE and then finding my Name & Shabby Chic Album Link on the page. Thanks again!
If you’d like to join my mailing list, you can SIGN UP HERE.
Hugs,
Cathy


Marvelous job! The flaps make it interesting, and of course I love the paper collection! Now, off to vote!
Thanks so much, Gloria! xoxo
I voted for you! Good luck! It’s exquisite!
Thanks, Vencine! xoxo
Gorgeous! Good luck Cathy!
Thank you, Dana! Fingers crossed! 😉
Voted for you. Gorgeous album. Is the chipboard album from Prima all one piece or are the pages separate from the cover?
Thanks so much, Suzanne! The Prima album is fully assembled and attached. 😀
Hi Cathy!
Are you kidding me??!!! This album is just fabulous in every possible way! I voted for you and now have to go back to your post and drink in all the details. So great to hear from you again!
Awww – thank you so much, Laura! I’m so glad you liked it! 😀
Hi Cathy. Ive missed your emails and inspiring creations. Your book is beautiful, the paper is lovely and gives a lovely olde worlde look to it. Ive voted for you of course. 😉 All the best. You are our winner anyway. From Sharon Wright from South Africa
Thanks so much, Sharon! That means a lot! Your kind words truly warm my heart! xox
Stunning awesome album, Cathy. A real treasure. Just voted for you – so holding thumbs. Just love your work. Warm Wishes & Hugs. Mary xx ( also from PCD Group – still treasure my Distressed Tag I received from you in a PCD swap ! )
Thank you so much, Miss Mary! I love your work too! I was so honored to win second place! Thank you so much for your vote! I truly appreciate it. So nice to have you visit. And I’m thrilled that you liked the tag! 😀